前回は仮想ネットワーク上にWebサーバーを構築しました
今回はProxyサーバーを構築し、管理ネットワークからWebサーバーを閲覧できるようにします
- 1.構成と準備
- 2.Webサーバーの構築
- 3.Proxyサーバーの構築 <- ここ
- 4.DNSサーバーの構築
- 5.Grafanaで監視基盤の構築
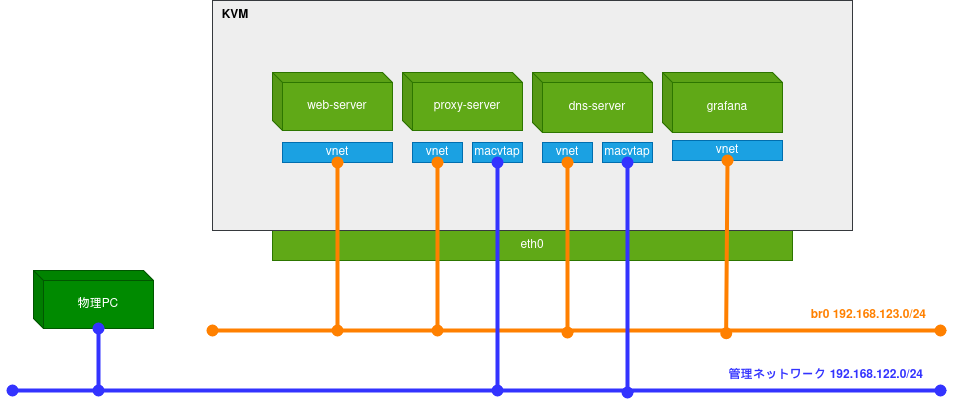
ネットワーク構成のイメージ図
仮想マシンのデプロイ
まずはProxyサーバー用の仮想マシンを作成していきます。
前回と同じ手順になるので作成や起動の手順は割愛します。(proxy-serverの名前で仮想マシンを作成しました)
つづいて、仮想マシンの仮想ネットワーク設定を行っていきます。
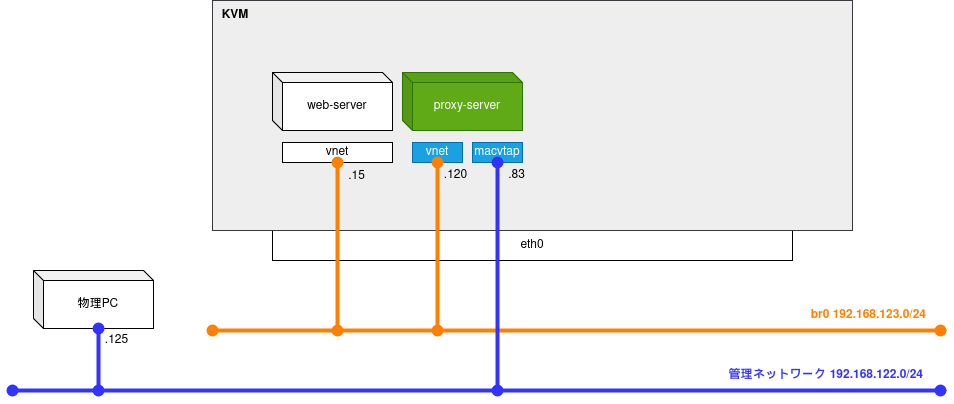
ProxyサーバーはWebサーバーを閲覧するPCが利用する管理ネットワークと、Webサーバーが接続される仮想ネットワークの両方に足を出している必要があります。
仮想ネットワークにはクローン時点で既に接続されているため、新しくネットワークインターフェースを作成し、管理ネットワークに接続します。
まずは仮想マシンのネットワークインターフェースからネットワークインターフェースの追加をクリックします
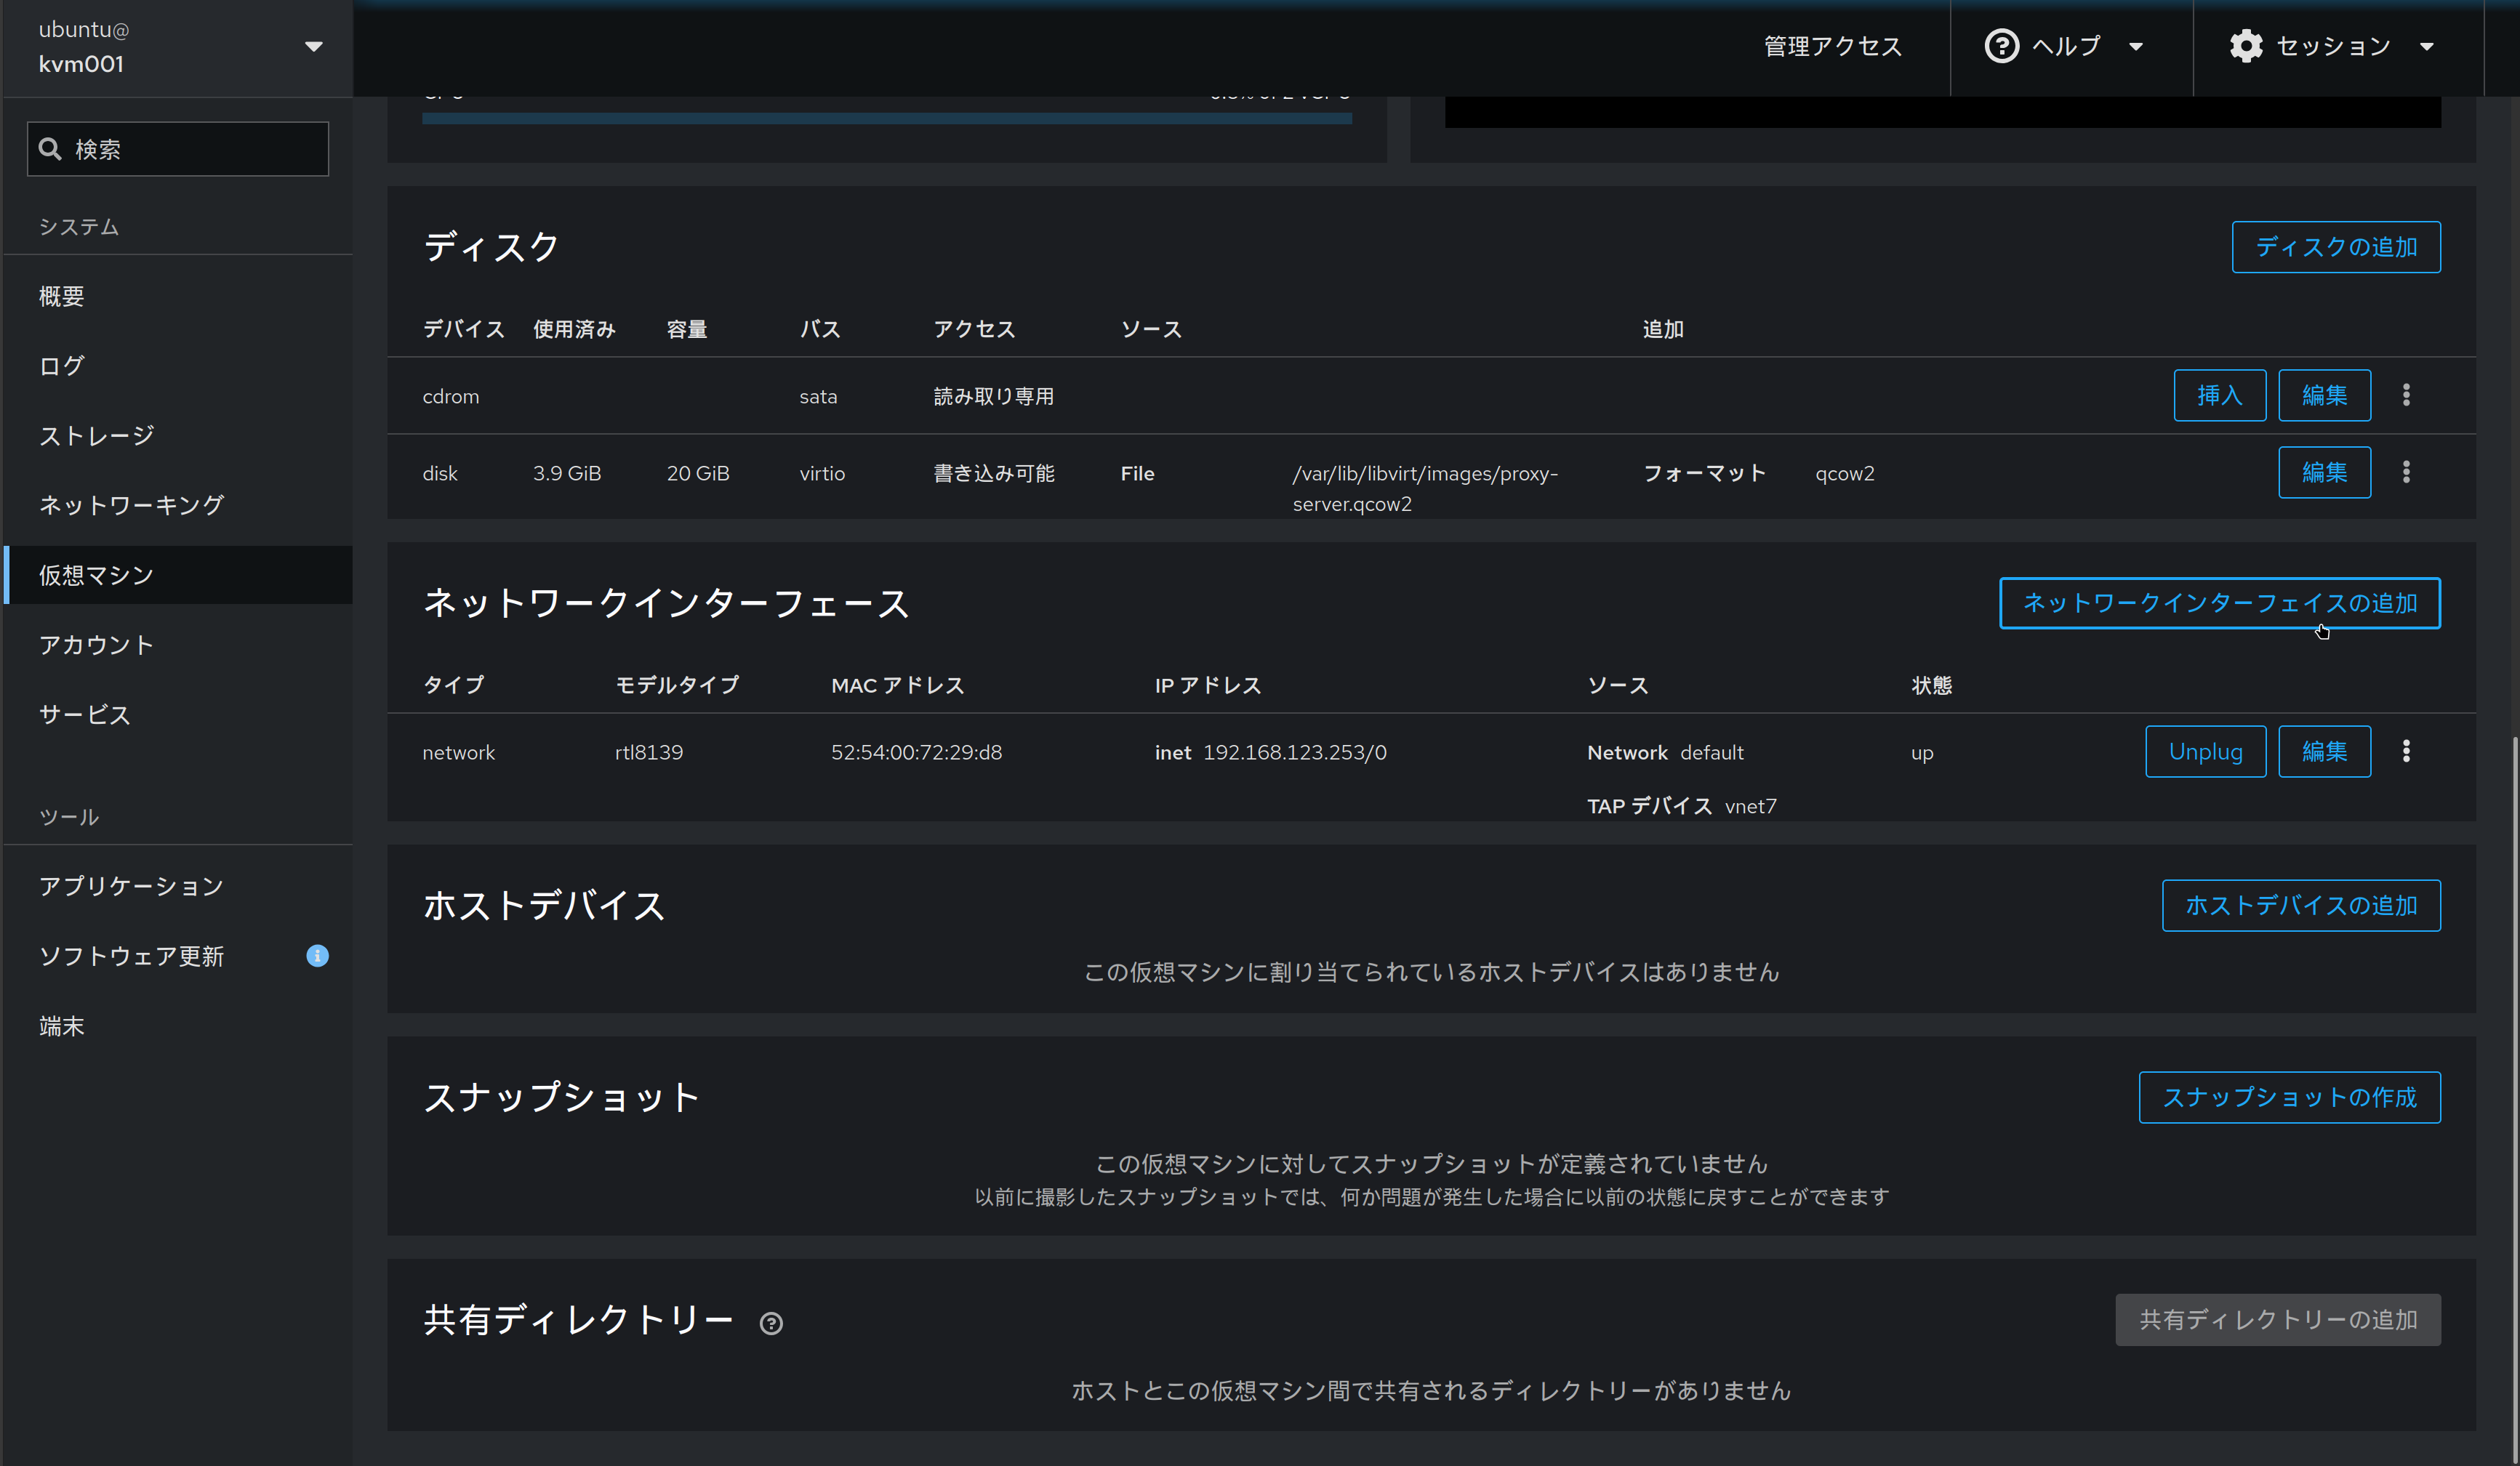
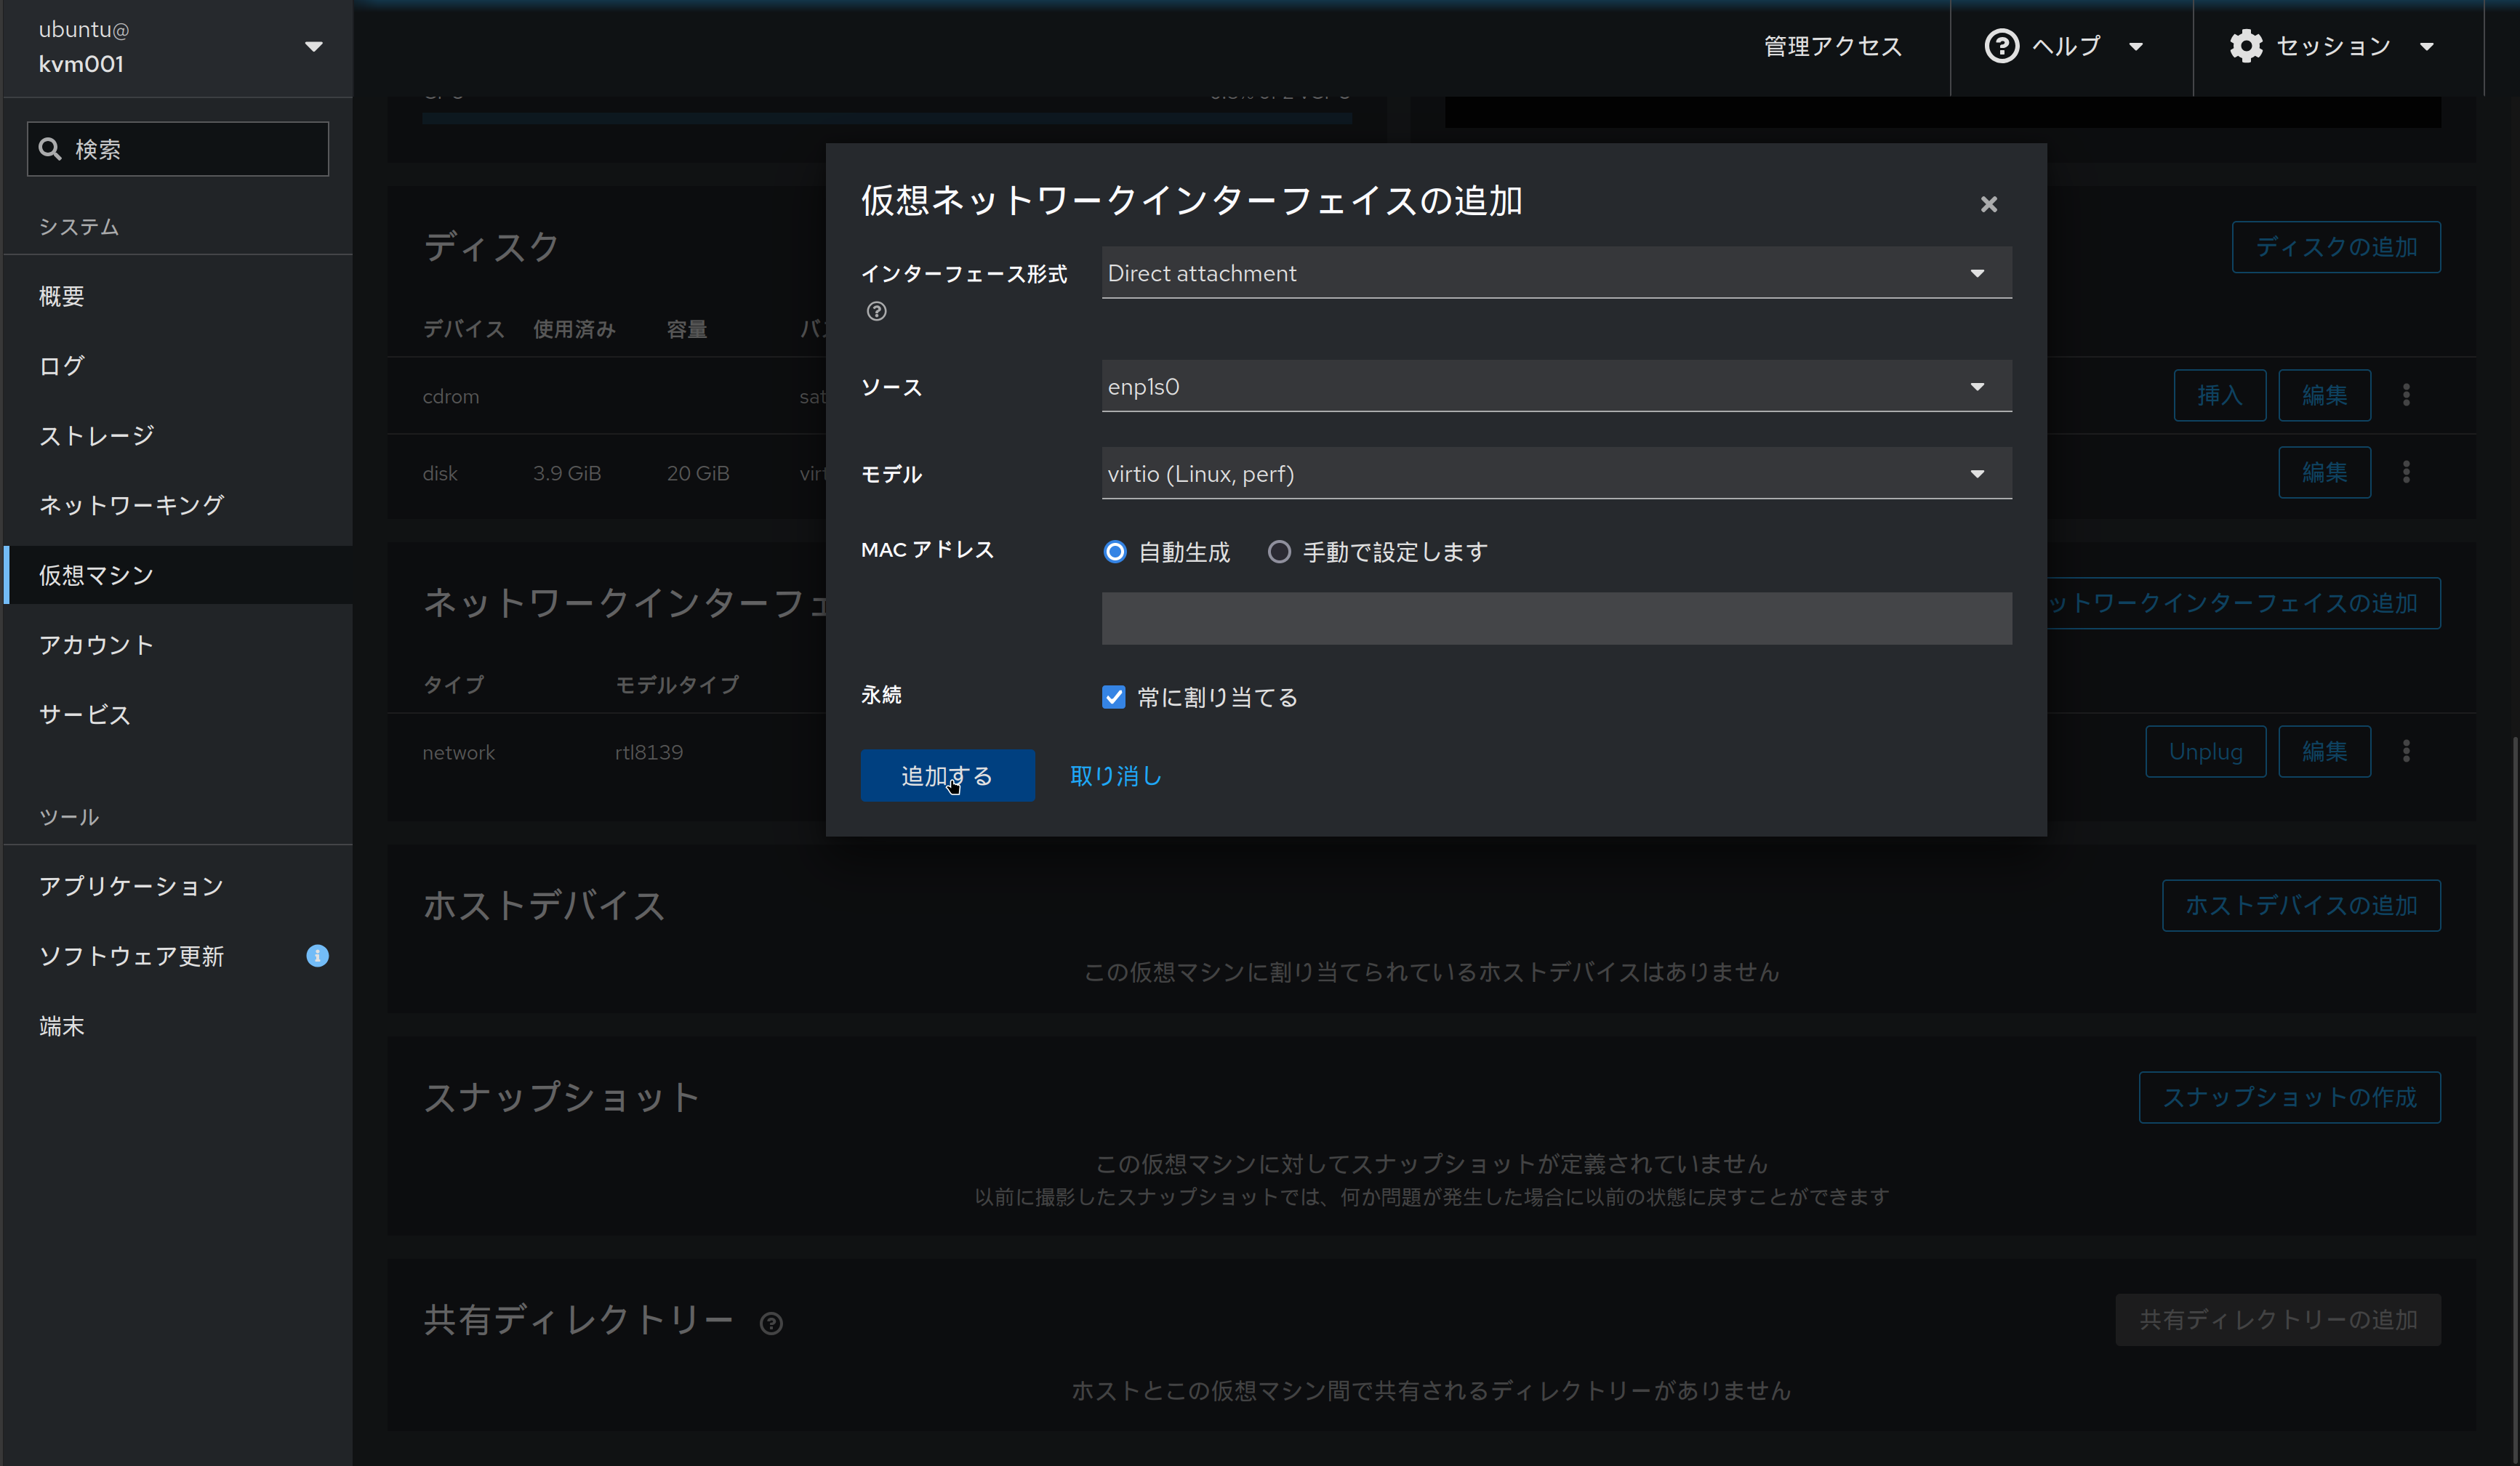
下記設定で追加します (仮想マシンがパワーオフの状態で実施する)
- インターフェース形式: Direct attachment
- ソース: enp1s0 (KVMホストの物理NICを指定します)
- モデル: virtio
- MACアドレス: 自動生成
- 永続: ☑常に割り当てる
追加が完了すると、Cockpitの画面で追加されていることが確認できます
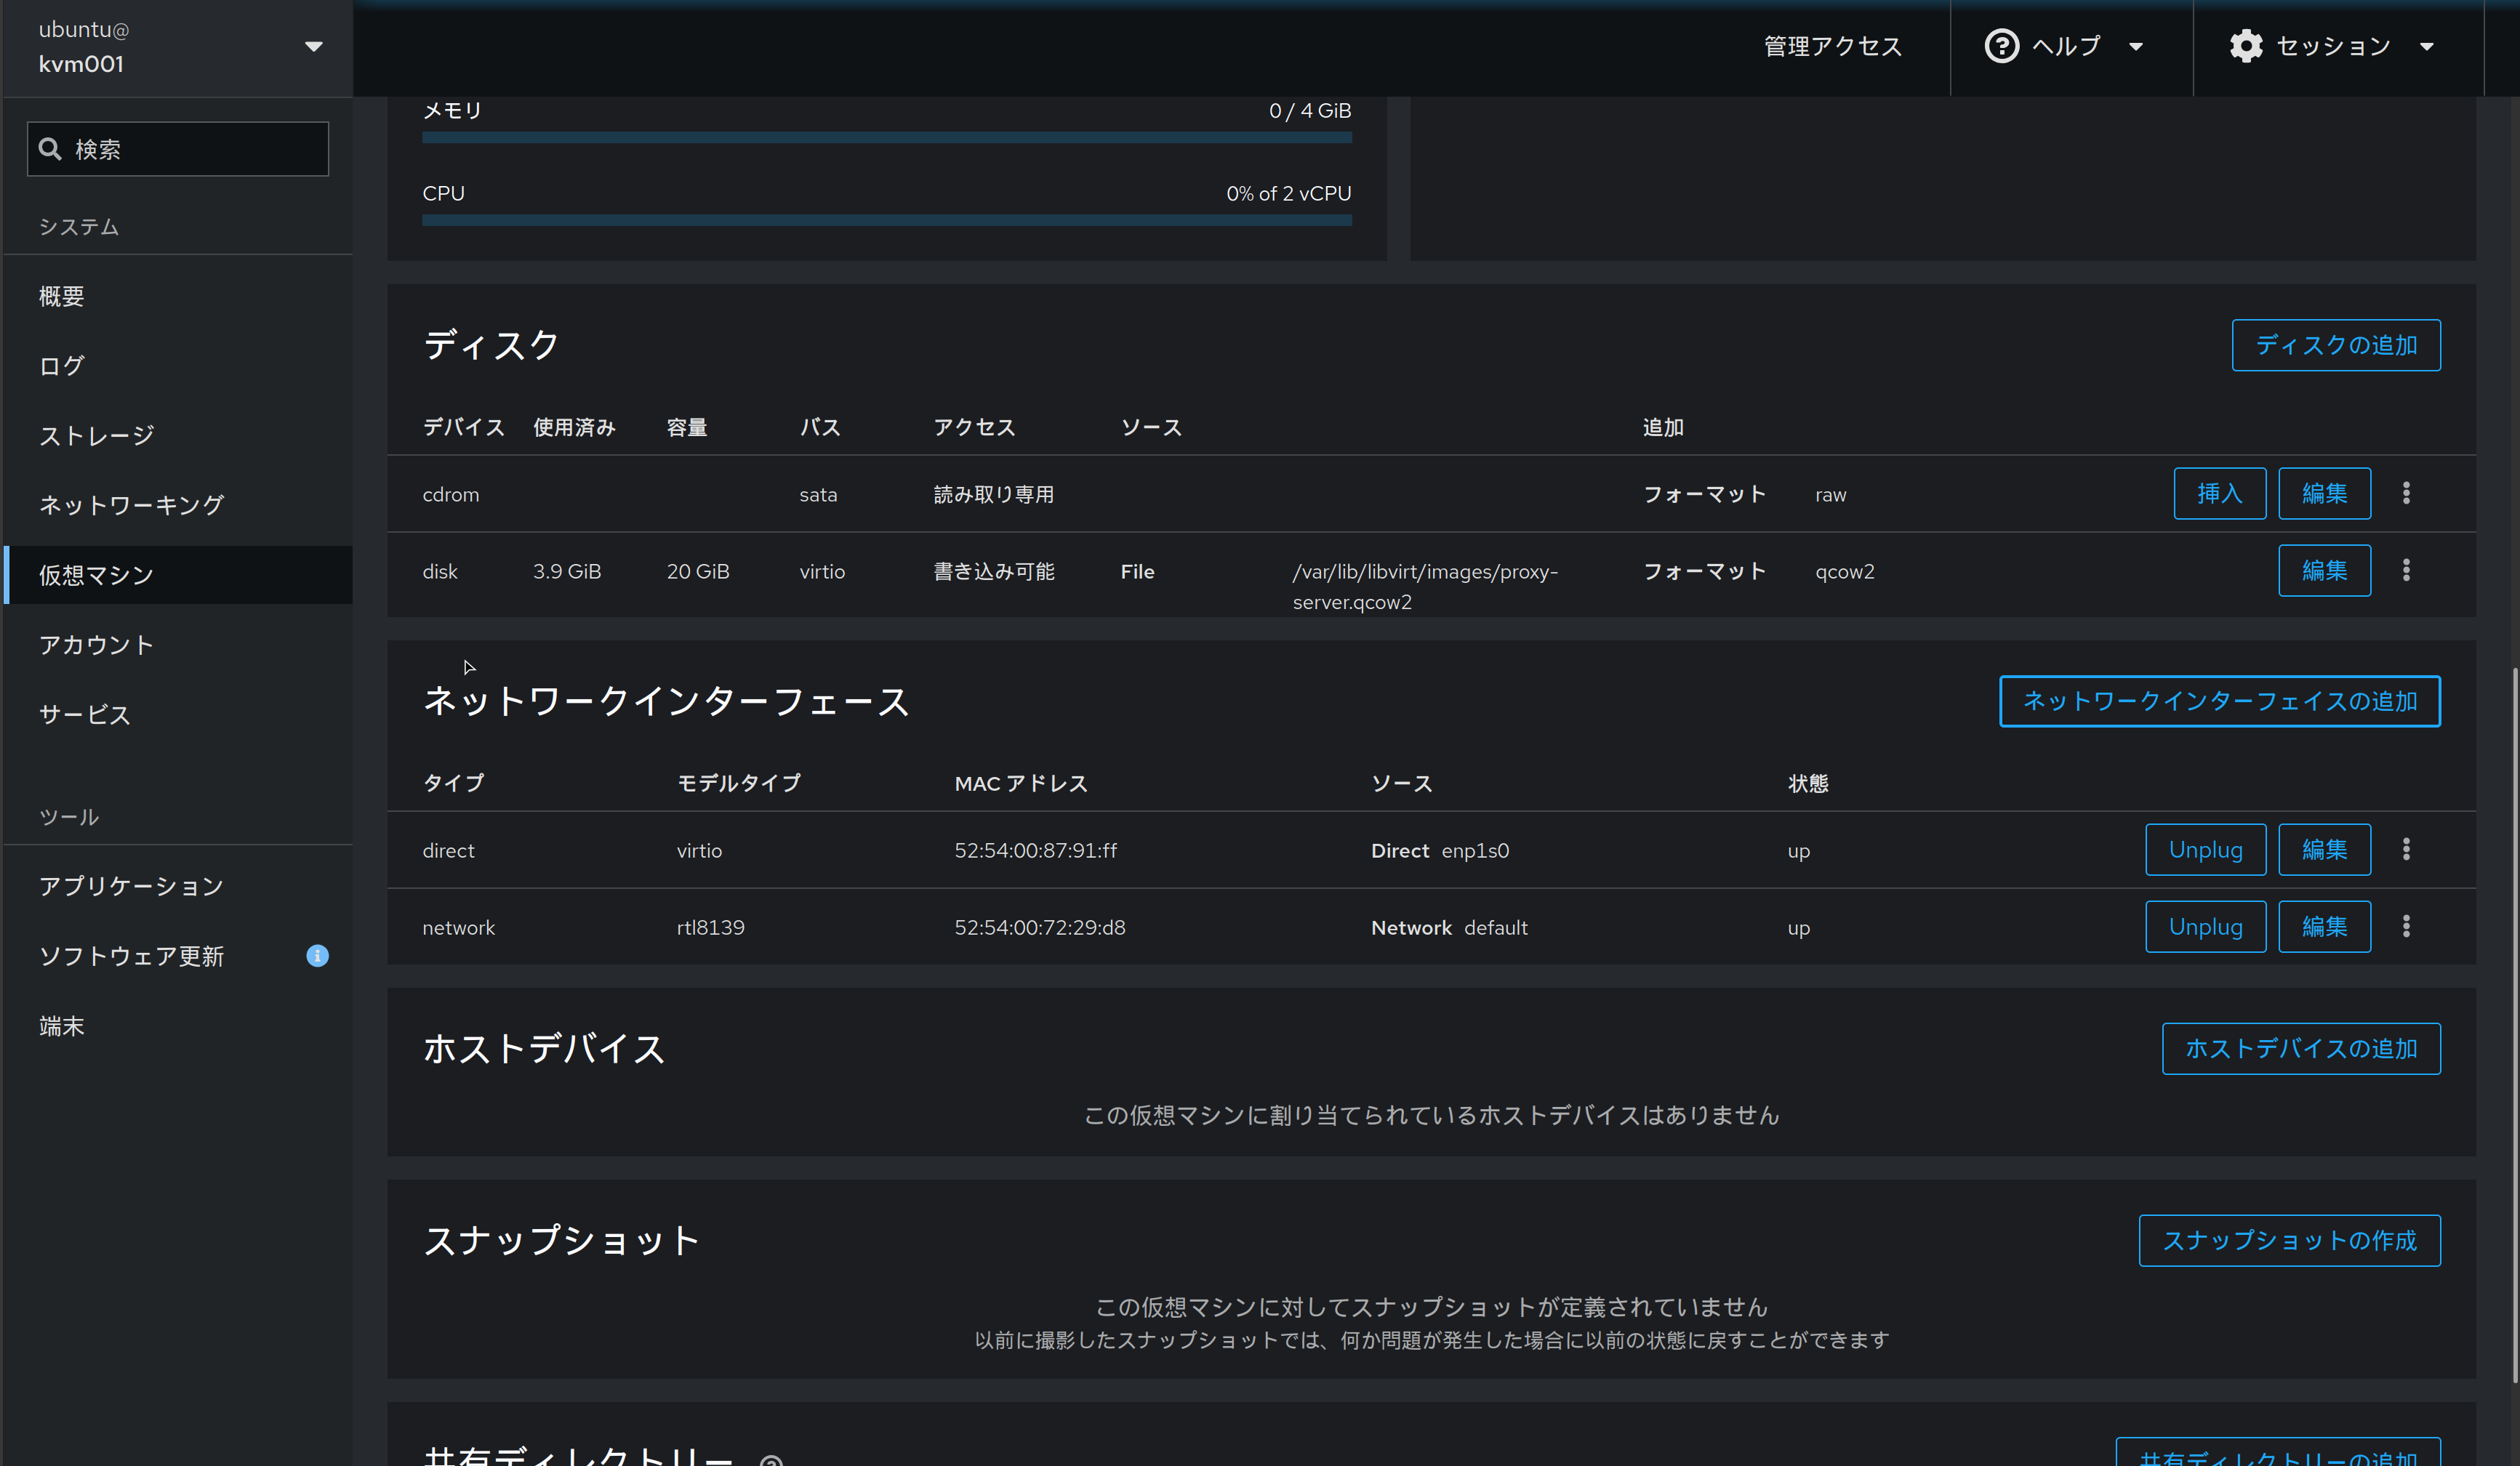
インターフェースが追加できたので、仮想マシンの方でもネットワークの設定をしてあげます
 1
 2
 3
 4
 5
 6
 7
 8
 9
10
11
12
13
14
15
| $ sudo cat /etc/netplan/50-cloud-init.yaml
# This file is generated from information provided by the datasource. Changes
# to it will not persist across an instance reboot. To disable cloud-init's
# network configuration capabilities, write a file
# /etc/cloud/cloud.cfg.d/99-disable-network-config.cfg with the following:
# network: {config: disabled}
network:
ethernets:
enp0s3:
dhcp4: true
dhcp-identifier: mac
enp0s7:
dhcp4: true
version: 2
$ sudo netplan apply
|
これで管理ネットワークと仮想ネットワークの両方に接続された仮想マシンが作成できました
- 管理ネットワーク側IP: 192.168.122.83
- 仮想ネットワーク側IP: 192.168.123.120
 1
 2
 3
 4
 5
 6
 7
 8
 9
10
11
12
13
14
| $ ip a show enp0s7
3: enp0s7: <BROADCAST,MULTICAST,UP,LOWER_UP> mtu 1500 qdisc pfifo_fast state UP group default qlen 1000
link/ether 52:54:00:87:91:ff brd ff:ff:ff:ff:ff:ff
inet 192.168.122.83/24 metric 100 brd 192.168.122.255 scope global dynamic enp0s7
valid_lft 3465sec preferred_lft 3465sec
inet6 fe80::5054:ff:fe87:91ff/64 scope link
valid_lft forever preferred_lft forever
$ ip a show enp0s3
2: enp0s3: <BROADCAST,MULTICAST,UP,LOWER_UP> mtu 1500 qdisc pfifo_fast state UP group default qlen 1000
link/ether 52:54:00:54:18:43 brd ff:ff:ff:ff:ff:ff
inet 192.168.123.120/24 metric 100 brd 192.168.123.255 scope global dynamic enp0s3
valid_lft 3468sec preferred_lft 3468sec
inet6 fe80::5054:ff:fe54:1843/64 scope link
valid_lft forever preferred_lft forever
|
Proxyサーバの構築
squidを用いてProxyサーバーを構築します。
まずは、デプロイした仮想マシン上でsquidをインストールします
1
| $ sudo apt install squid
|
インストールが完了したら、設定を行っていきます。
設定ファイルは/etc/squid/squid.confにあります。
1
| $ sudo vi /etc/squid/squid.conf
|
ファイルの1400行目あたりに下記のような記載があるので、Allow_Local_Networkの設定を追記します
 1
 2
 3
 4
 5
 6
 7
 8
 9
10
11
12
| # Example rule allowing access from your local networks.
# Adapt to list your (internal) IP networks from where browsing
# should be allowed
acl localnet src 0.0.0.1-0.255.255.255 # RFC 1122 "this" network (LAN)
acl localnet src 10.0.0.0/8 # RFC 1918 local private network (LAN)
acl localnet src 100.64.0.0/10 # RFC 6598 shared address space (CGN)
acl localnet src 169.254.0.0/16 # RFC 3927 link-local (directly plugged) machines
acl localnet src 172.16.0.0/12 # RFC 1918 local private network (LAN)
acl localnet src 192.168.0.0/16 # RFC 1918 local private network (LAN)
acl localnet src fc00::/7 # RFC 4193 local private network range
acl localnet src fe80::/10 # RFC 4291 link-local (directly plugged) machines
acl Allow_Local_Network src 192.168.123.0/24 # <- ★ この行を追記
|
さらに、1601行目あたりの下記コメントがある行に二行追記します
1
2
3
4
5
| # For example, to allow access from your local networks, you may uncomment the
# following rule (and/or add rules that match your definition of "local"):
# http_access allow localnet
http_access allow localnet
http_access allow Allow_Local_Network
|
上記設定が完了したら、下記コマンドでsquidを再起動します。
1
| $ sudo systemctl restart squid
|
Proxyサーバーを経由したWebサーバーへのアクセス
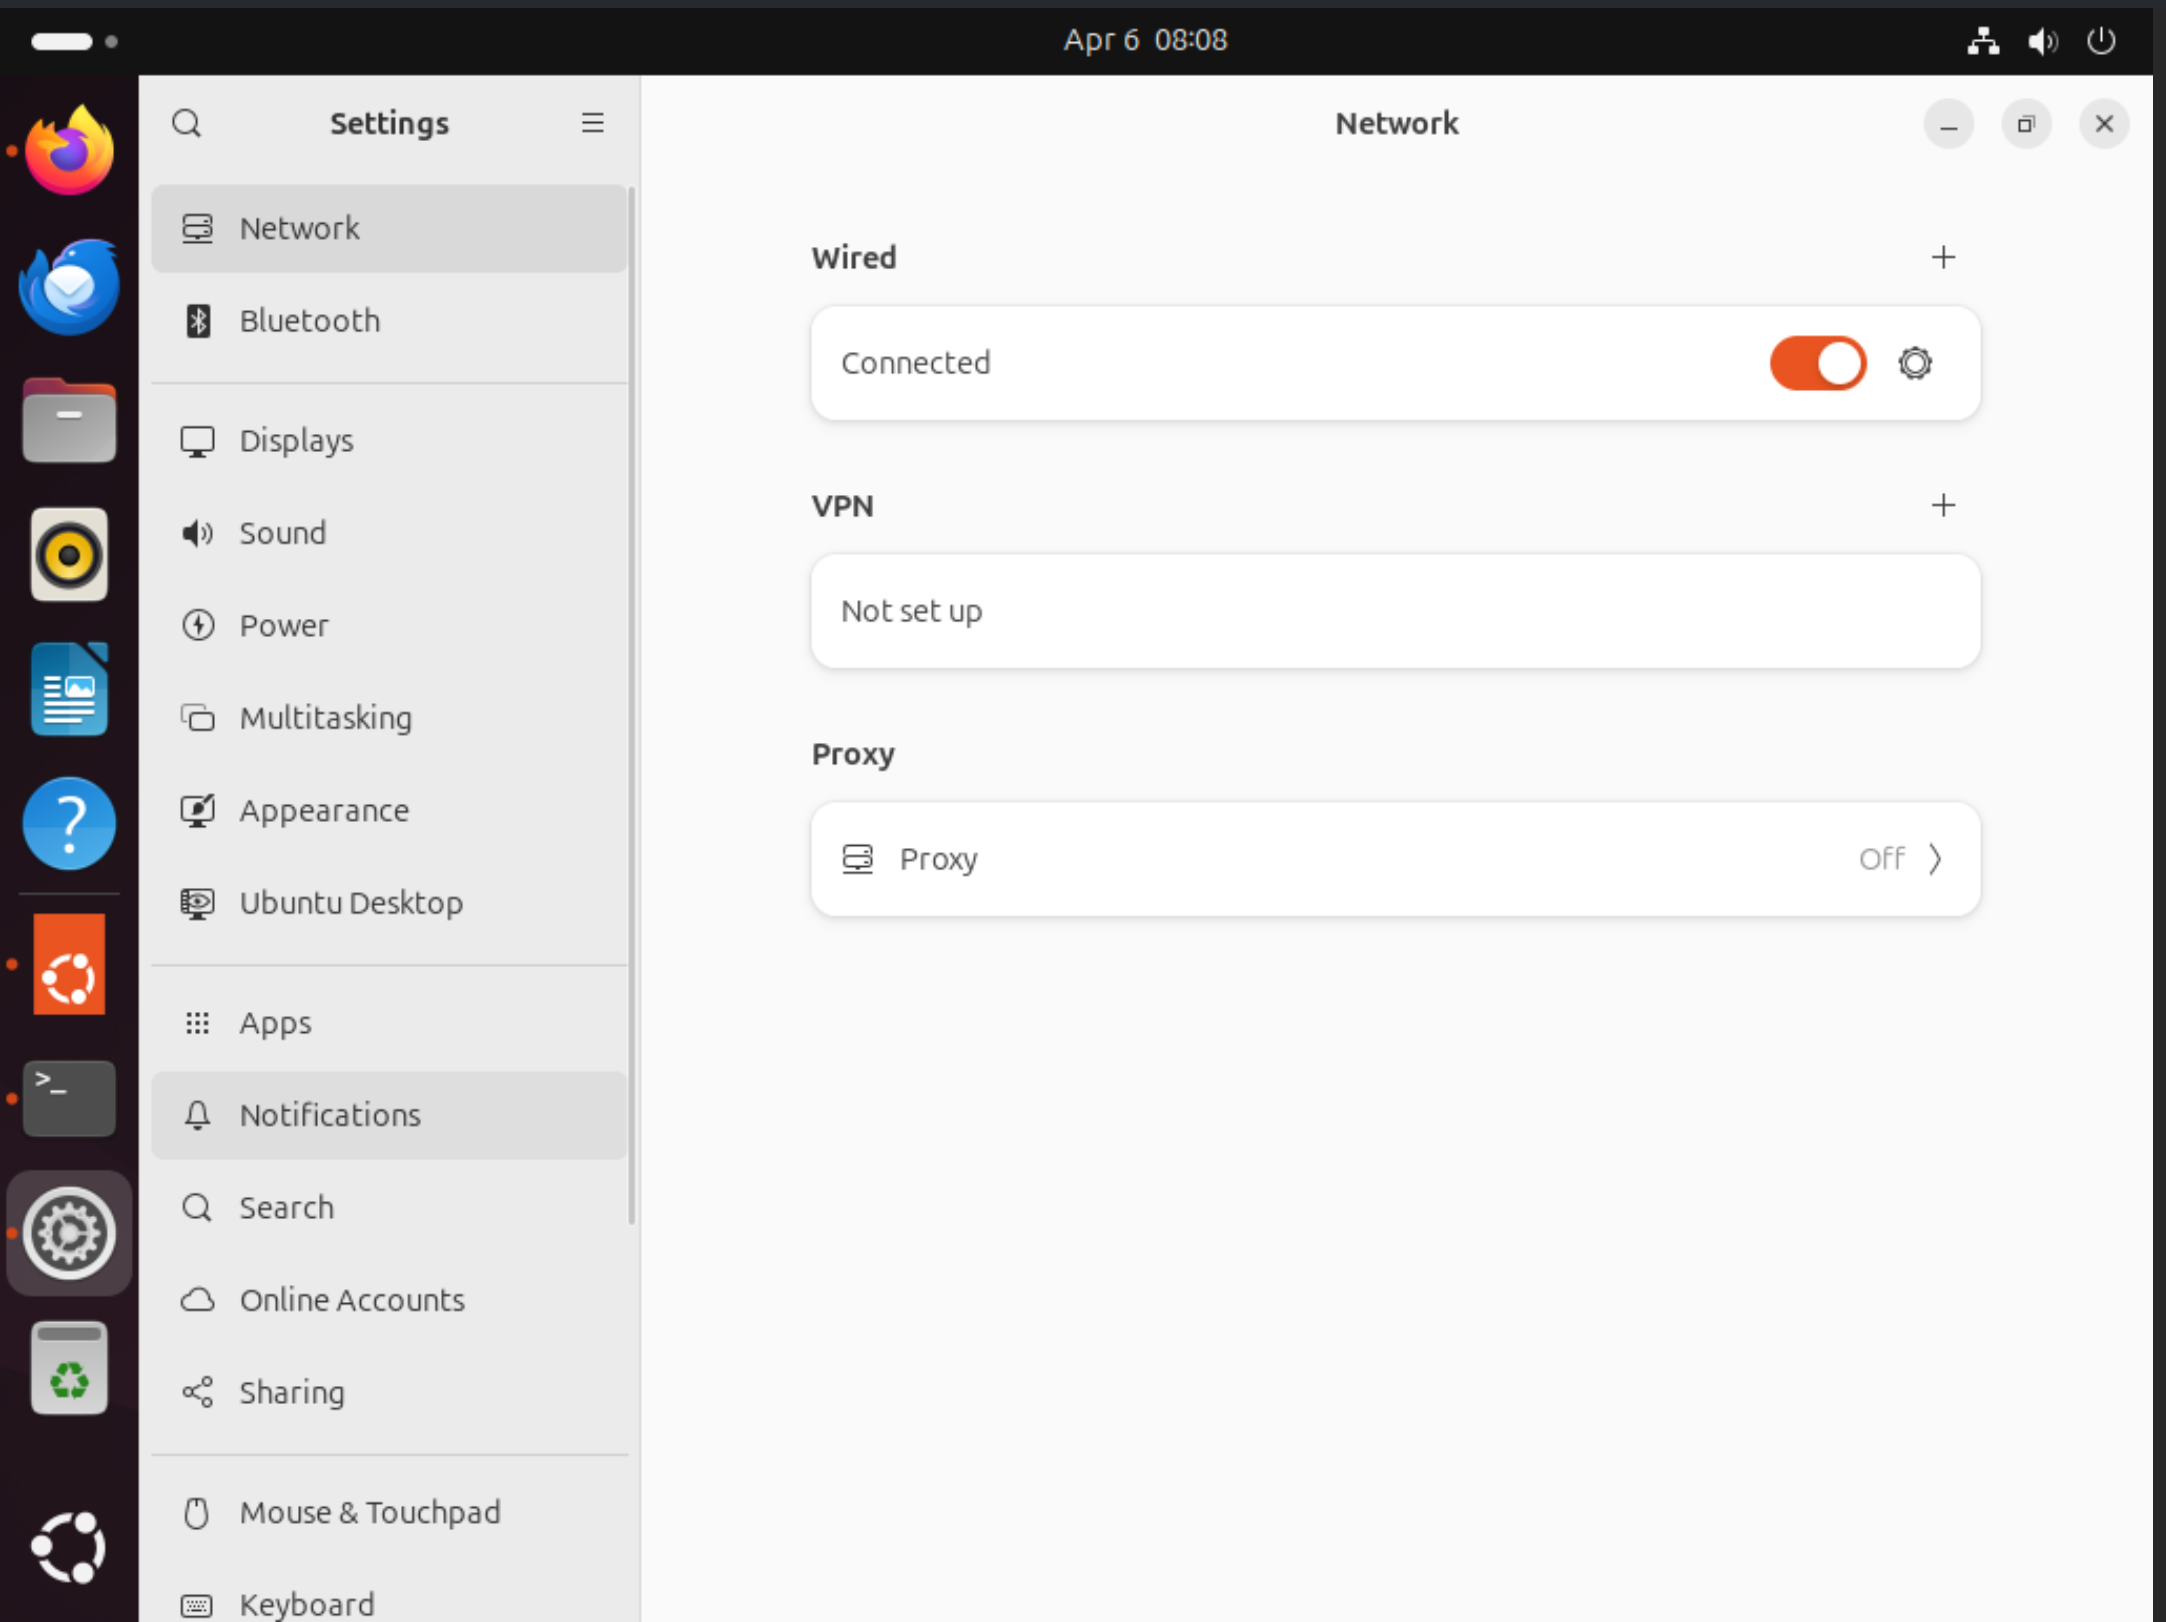
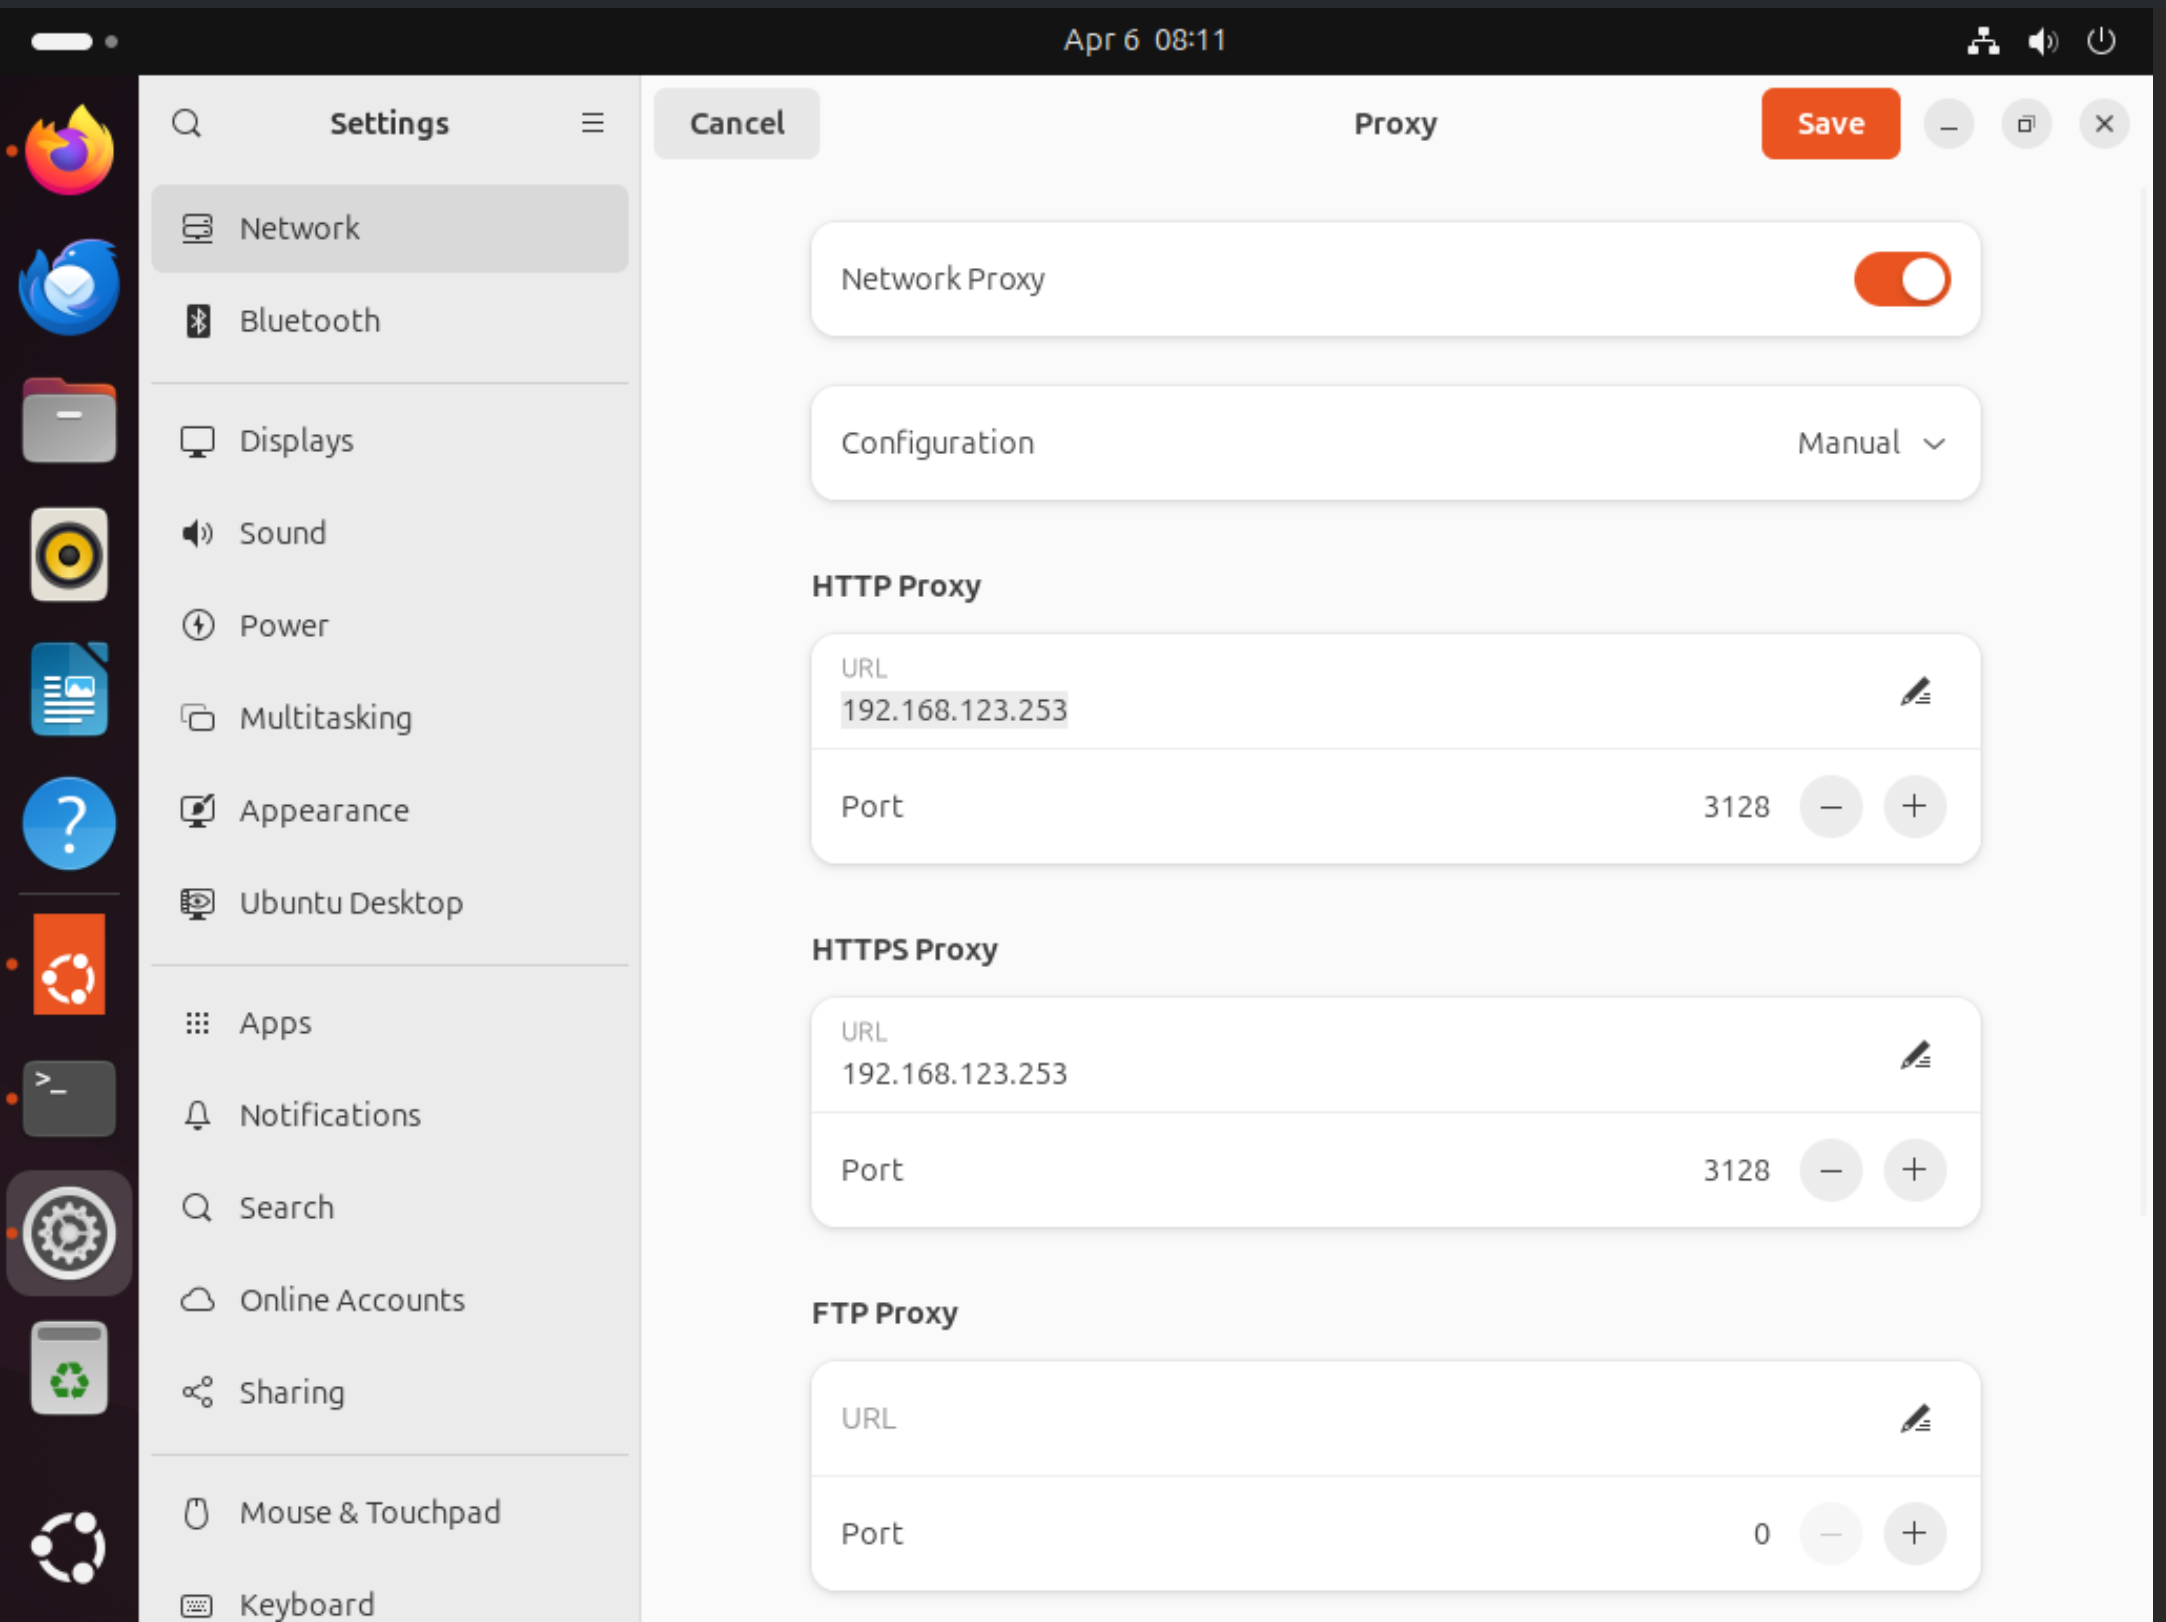
Proxyサーバーの構築が完了したので、これを利用してWebサーバーへのアクセスを行います。
そのためには、WebサーバーへアクセスするクライアントにてProxyサーバーを利用する設定を行う必要があります。
今回はUbuntuサーバーを用いるため、以下の手順でProxyサーバーの設定を行います
- 「Settings」→「Network」→「Proxy」
- 「Network Proxy」を有効にし、以下設定を入力する
- Configuration:
Manual - HTTP Proxy:
- URL: Proxyサーバーの管理用ネットワーク側のIP (
192.168.122.83) - Port: ProxyサーバーのPort (
3128)
- HTTPS Proxy:
- URL: Proxyサーバーの管理用ネットワーク側のIP (
192.168.122.83) - Port: ProxyサーバーのPort (
3128)
上記設定が完了したら、ブラウザでWebサーバーにアクセスができるようになります!(http://192.168.123.15:5230)
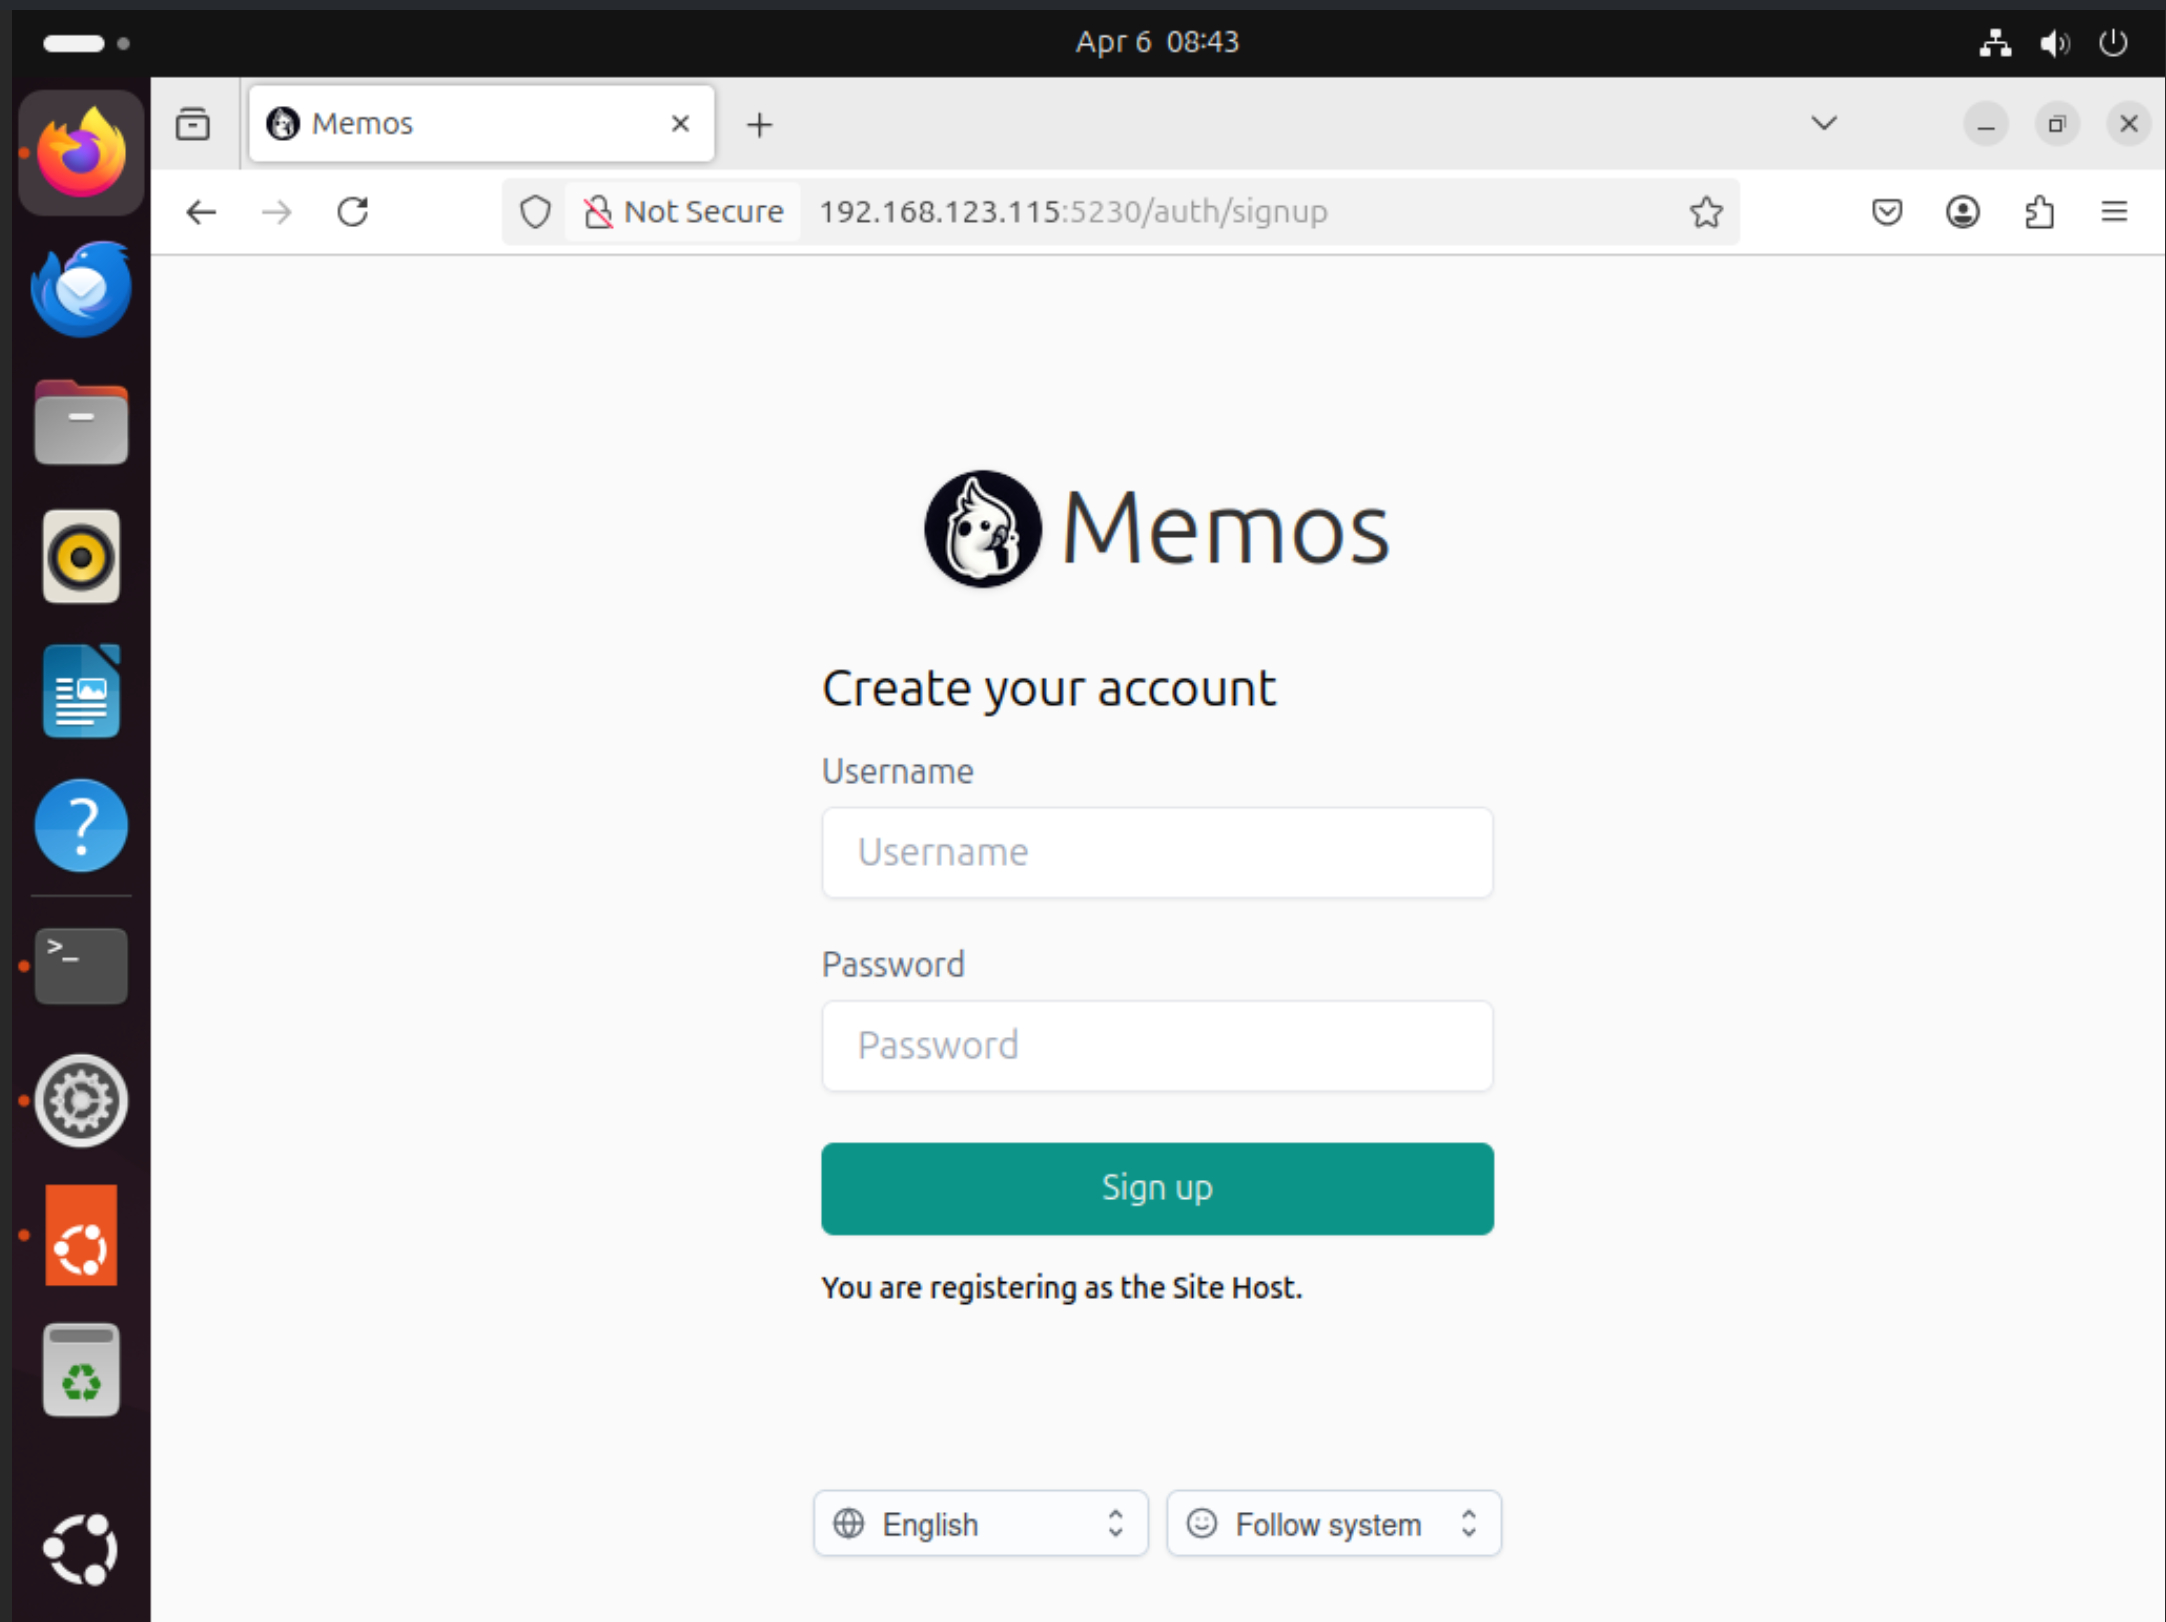
以上でsquidを用いたProxyサーバーの構築ができました。
次は4.DNSサーバーの構築でLAでN名前解決ができるようにします